

It has finally happened. Keys on your MacBook Pro aren’t responding, there’s a crack on the screen, or the battery no longer holds enough of a charge to make it useful. A repair is in your future, which entails bringing the Mac to an Apple Store or Apple Authorized Service Provider or shipping it back to Apple. Regardless of what repair approach you take, there are some steps that we — and Apple — highly recommend that you follow first.
Why? Three reasons:
- You need to protect yourself from data loss. The Mac could be lost or damaged while it’s out of your control, or the repairs might require replacing the Mac’s internal drive or logic board (or even the entire computer), even if you don’t anticipate that as a fix.
- You need to protect your data from prying eyes. This is especially true if you store passwords in an insecure way. But you’re using a password manager, aren’t you?
- Apple needs to be able to use the Mac sufficiently to determine that it works.
Here’s what you should do, if possible. Depending on what’s wrong with your Mac, you may not be able to perform all — or any — of these tasks. If that’s the case, complete as many as you can.
Back Up Your Mac
The one thing you must do is make a backup of your data, or preferably two. There’s no guarantee that you’ll get the same Mac back with the same internal storage. Since you’re already backing up (right?!?), this should mostly be a matter of updating your backups.
We recommend both using Time Machine and making a duplicate using an app like Carbon Copy Cloner. That second backup protects you against the first failing when you try to restore — it’s uncommon but not unknown. (A third backup to an online service like Backblaze is also a good idea, but it won’t help in this scenario unless something happens to both your other backups.)
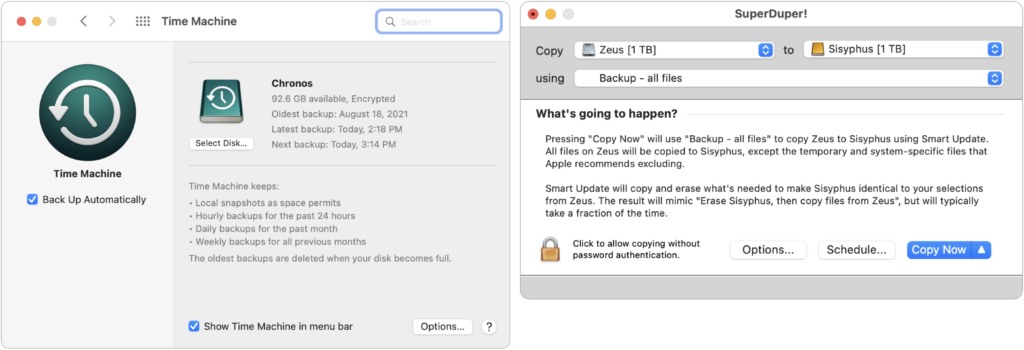
If your Mac laptop boots but can’t be used due to a broken keyboard or trackpad, remember that you can attach an external keyboard and mouse. Also, if a broken screen prevents you from using it, try using Target Disk Mode to make your backup to another Mac.
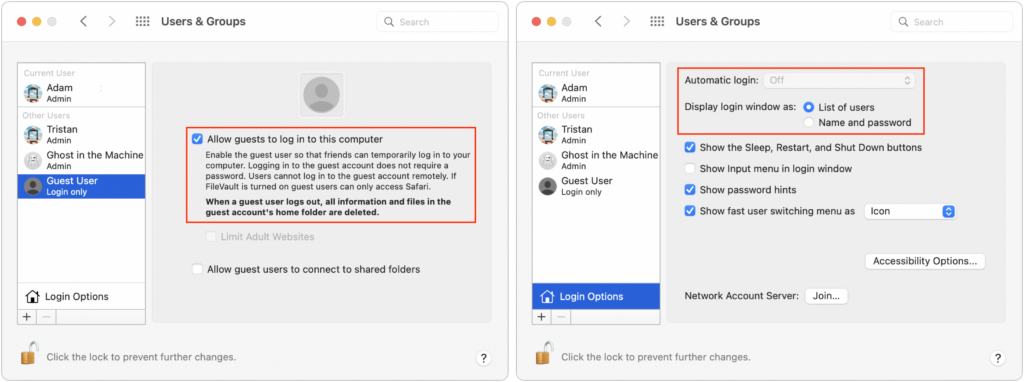
Enable Guest Access
For some problems, the repair technician may need to verify that your Mac functions normally after the repair — imagine trying to verify that each of the keys on the keyboard work. Don’t give a repair tech your admin password if possible because that gives them full access to all your data.
Instead, head to System Preferences > Users & Groups. Click the lock icon at the lower left of the preference pane to unlock the pane. Click Guest User in the sidebar and then select “Allow guests to log in to this computer.” Also, click Login Options and make sure Automatic Login is turned off (it’s locked off when FileVault is enabled, which we strongly recommend) and Display Login Window As is set to List of Users.
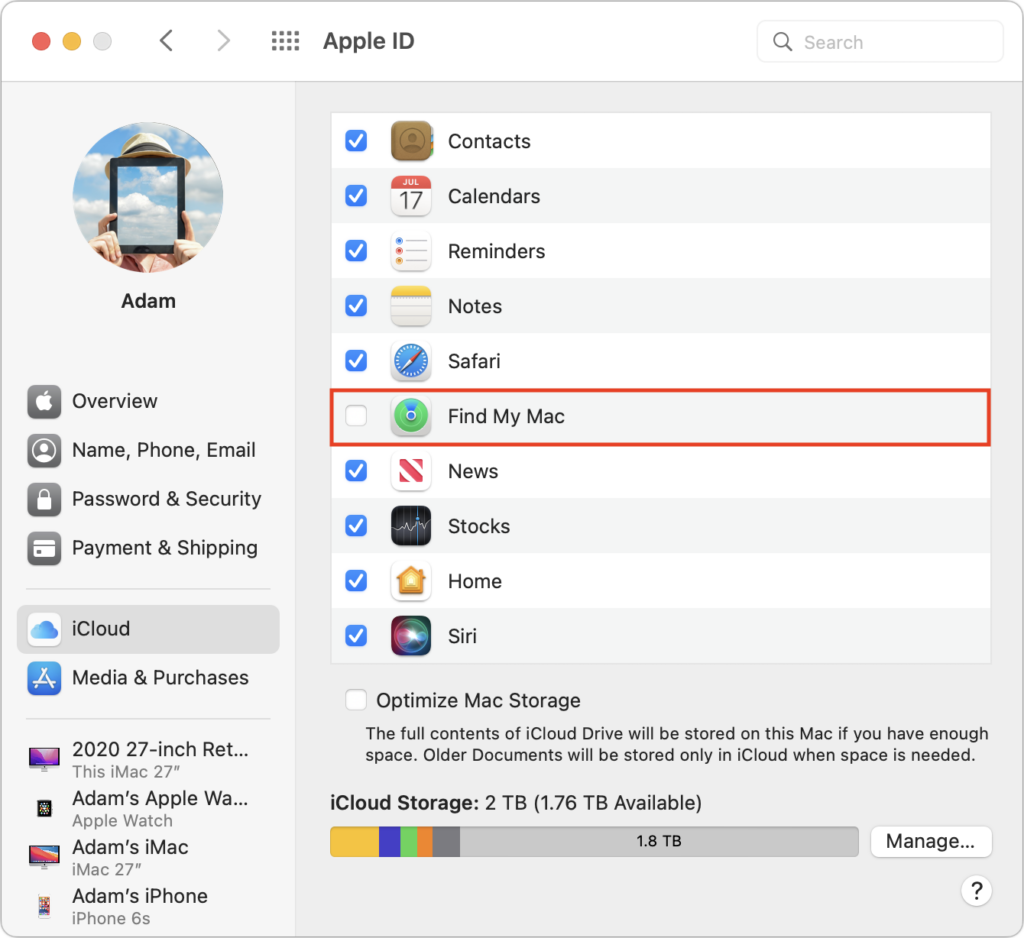
Turn Off Find My Mac
Apple won’t repair a Mac that has Find My Mac enabled, presumably due to Activation Lock preventing certain types of fixes.
Iit’s easy to turn off: open System Preferences > Apple ID > iCloud and uncheck Find My Mac. (Make sure to turn it back on when you get your Mac back!)
Turn Off Your Firmware Password
Few people have enabled a firmware password, and Macs with Apple silicon don’t support them, but if you have an older Intel-based Mac with a firmware password enabled, you’ll need to turn it off before the Mac can be repaired.
To do this, start up in macOS Recovery, choose Utilities > Startup Security Utility or Firmware Password Utility, click Turn Off Firmware Password, and enter the firmware password when prompted. Quit the utility and then restart the Mac.
Deauthorize Your Computer for iTunes Store Purchases
You don’t have to deauthorize your Mac before sending it in for repair, but it could save some headaches later on. Certain types of repairs might change the identity of the Mac in such a way that it’s no longer authorized but takes up one of your five authorizations. Authorizing another Mac could require that you first deauthorize all your computers, which you can do only once per year. Luckily, deauthorizing a Mac is easy to do.
In either the Music app or the TV app, choose Account > Authorizations > Deauthorize This Computer. Sign in with your Apple ID, and click Deauthorize when prompted. The same submenu lets you authorize the Mac again when you get it back.

For Extra, Extra Security
Those whose Macs contain truly sensitive data (you know, patient records, corporate trade secrets, space laser access codes, etc.) may wish to take additional steps to ensure that there’s no way that data could be compromised. The first step is to turn on FileVault, which encrypts the entire contents of the Mac’s internal storage. This is quick and easy on Macs with T2 chips or Apple silicon, where it piggybacks on the fact that internal storage is already encrypted. On older Macs, encrypting a large drive can take many hours.
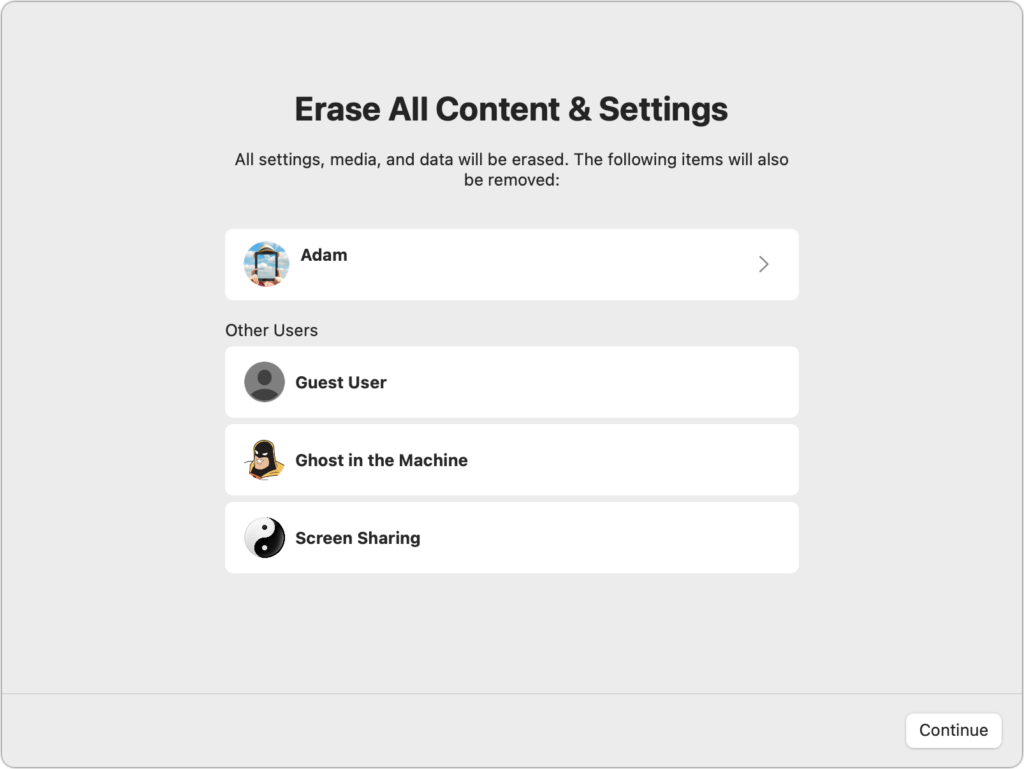
In an ideal world, of course, you would have turned on FileVault as soon as you started using the Mac. If that’s not the case, turn it on now — we’ll wait. That may be sufficient if your data is sensitive but not life-changingly sensitive. If you’re storing the equivalent to the keys to Fort Knox, take the next step, which is to erase the Mac after making your backups. The best way to do this varies:
- Newer Mac: On a Mac with a T2 chip or Apple silicon running macOS 12 Monterey, open System Preferences, click the System Preferences menu in the menu bar, and choose Erase All Content and Settings to launch Erase Assistant. This approach “erases” all your data by destroying the encryption keys necessary to decrypt the data; it’s extremely quick and secure.
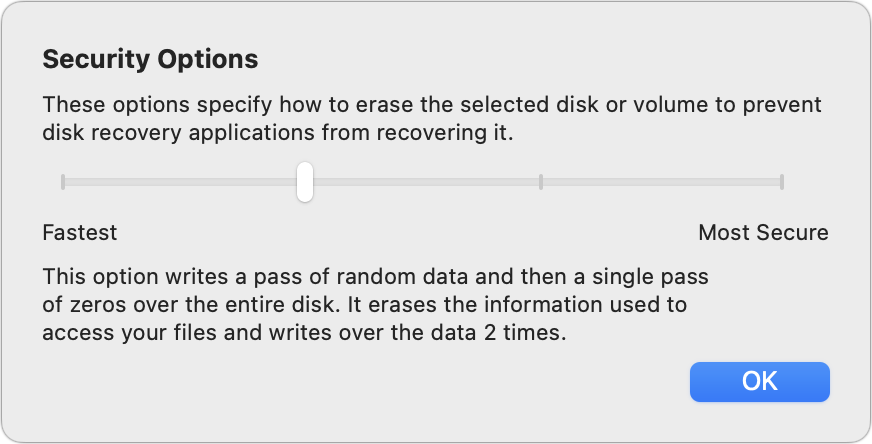
- Older Mac: For a Mac without even a T2 chip or one running an earlier version of macOS, boot into macOS Recovery and use Disk Utility to erase the internal drive and reinstall macOS. If you’re erasing a hard drive, click the Security Options button and choose how many passes of random data and zeroes to write to the drive: two, three, or seven. These extra passes take a long time, and the option isn’t available for SSDs, which can’t be securely erased other than by turning off FileVault.
Needless to say, when you get the Mac back, you’ll need to restore from your backup. That will be time-consuming, but it’s a small price to pay for peace of mind.
Don’t go overboard, though — almost no one needs to worry about this level of security, and if you do, you probably work for an employer with policies and practices to protect data. For the rest of us, it’s just a matter of being sensible and cautious by making a backup, enabling guest access, and turning off Find My Mac.
(Featured image by iStock.com/Rawf8)